Here are some tips that might be helpful to keep in mind as we build a Warre hive.
Cutting
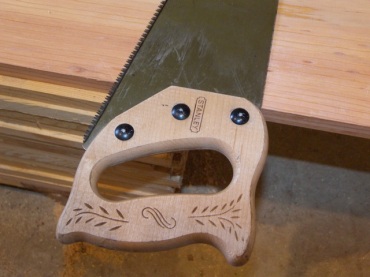
Here is a quick way to measure and cut wood using a measuring tape, a hand saw and a pencil.
Draw a mark with your pencil where you want to cut the board. Be sure to place a mark at each edge of the board. Take your handsaw and set the handle at the base of the board, as in the picture below. Align the spine of the saw to the pencil marks.

While holding the saw with one hand, use your pencil to draw a line down the board along the spine of your saw as in the picture below.
The marked board is ready to cut.
Fastening
Whether you are using nails or screws, it is important to remember that fasteners can split your wood. Here are some ways to prevent your wood from splitting.
Choose the right size of fastener
If your fastener is too wide for the width of board you are using, the wood may split apart as you install the fastener. A good rule of thumb is to use fasteners whose diameter is one third to one half the width of the board you are fastening. For instance, if you are fastening wood with a 1 inch width, then use a nail or screw whose diameter is 1/3 inch to 1/2 inch.
Fasten away from edges
Position your nails or screws away from the edges of the board. Your wood can split if the fasteners are installed right at the edge of the board. Make sure that the fastener is centered when fastening straight into the edge of a board. Also, watch that the fastener is vertical as it goes into the wood. This will help to keep your wood from splitting.
Pre-drill holes
In some cases you may need to pre-drill holes for your fasteners. Use a drill bit with a diameter a little smaller than that of the the nail or screw you will use. Drill a hole into the wood, then install your fastener into this hole. Pre-drilling is especially helpful for wood with knots, or for places in the board which could split easily.
Safety
Bee Safe!
Working with wood can be dangerous. Always be sure to read and understand the user manuals that came with your tools. Use your tools, chemicals and finishes in accordance with their respective user manuals and the instructions that were provided with them. Always wear protective equipment and be sure to employ all of the safety features that came with your tools.
This safety warning does not address all of the potential dangers that could arise from using this construction guide or building a Warre hive. It is up to you to read and understand your user manuals and instructions for all of your tools, chemicals and finishes. Be smart with your tools, and use your common sense. Bee Safe!
In the next section, we will start assembling the Warre Hive Quilt…


There is a lot of things to learn from your this blog posts
Hey Nick,
As you’ve been told many times, this is a great site and a very helpful resource. I have a question about the section “Choose the right size of fastener”. You mention using a screw that is 1/3″ to 1/2″ in diameter for a 1″ board. Am I understanding correctly? That sounds a bit wide.
Thanks,
Matthew
HI Matthew, thanks for all your great comments. The sizes are a little large but when I put the guide together I was trying to keep low cost in mind and the the big range in fasteners is more of a “you can use pretty much anything you have on hand” statement 🙂 The thing to keep in mind though is that if your using a large fastener then be sure to predrill
Great Info Matt. I thought that it may be interesting to all of you that 29% of injuries resulting from contact with objects or equipment were cuts, lacerations or punctures. Just a bit of information to remember when working with sharp object like saws.
great site. thank you
Hi, I am new to beekeeping and researching the various hive versions. I love this concept of natural comb building. My question… as you add new sections to the bottom how do you lift the top ones? Especially if you are three high.
Hi Rick, each hive body is made with handles so you pull the 3 existing off 1 at a time, add the new one then restack the other 3 in the order they came off.
I think he means the size of the screw/nail HEAD.
I’d use screws…..but I’d also pre drill the board you are attaching
They also make self drilling screws that will drill this pilot hole automatically.
In addition, I’d glue the joint………then screw it
One tip is to clamp the boards together close to the middle…..then screw one screw as close the middle as you can ….Then back out the screw, take off the clamp, glue the board, screw in that one screw tightly. Then you can screw 2 more screws at the outside…….and you can move the board into position if it’s warped a little…………….z